

Tutorial: Video Generation with AI
Build Training Videos in 2 Hours

This tutorial is also written as an additional material for the training I am giving on the 22nd of January, 2025 by AIAtWork where we will go through this tutorial live!
Everyone is talking about Sora and Veo, but if you’ve ever tried to type “Make me a 2-minute movie” into a prompt box, you know the reality: you get morphing limbs, hallucinated text, and characters that change faces every three seconds.
Today, I’m breaking down the exact process I used to create the “Silent Breach” training video: a coherent, multi-scene narrative created for a fraction of the cost of traditional production.
The Core Problem: The 10-Second Barrier
Why can’t you just generate a long video in one go? It comes down to the architecture. Modern video models use 3D latent diffusion. Unlike a flipbook that draws one page after another, these models generate the entire video “volume” (divided into spacetime patches) all at once.
This approach is great for consistency because the model “knows” that if a shirt is blue in second 1, it must be blue in second 5. But this method is computationally massive. Because everything is generated simultaneously, these models hit a hard ceiling at about 5 to 8 seconds.
The Workaround: The “Handshake Method” Since we can’t generate a long video at once, we treat the video like a relay race. We use a technique called the Handshake Method (or Video Extension Workflow). We generate short 5-to-10-second clips and stitch them together, strictly using the last frame of the previous clip to anchor the start of the next one.
Here is the step-by-step pipeline.

This is a high level overview, but no worries, we will go step by step to what we are doing.
The AI Tool Stack: MiniMax and Gemini
For this specific workflow, we aren’t using the usual suspects like Runway or Pika. We are leaning heavily on MiniMax.
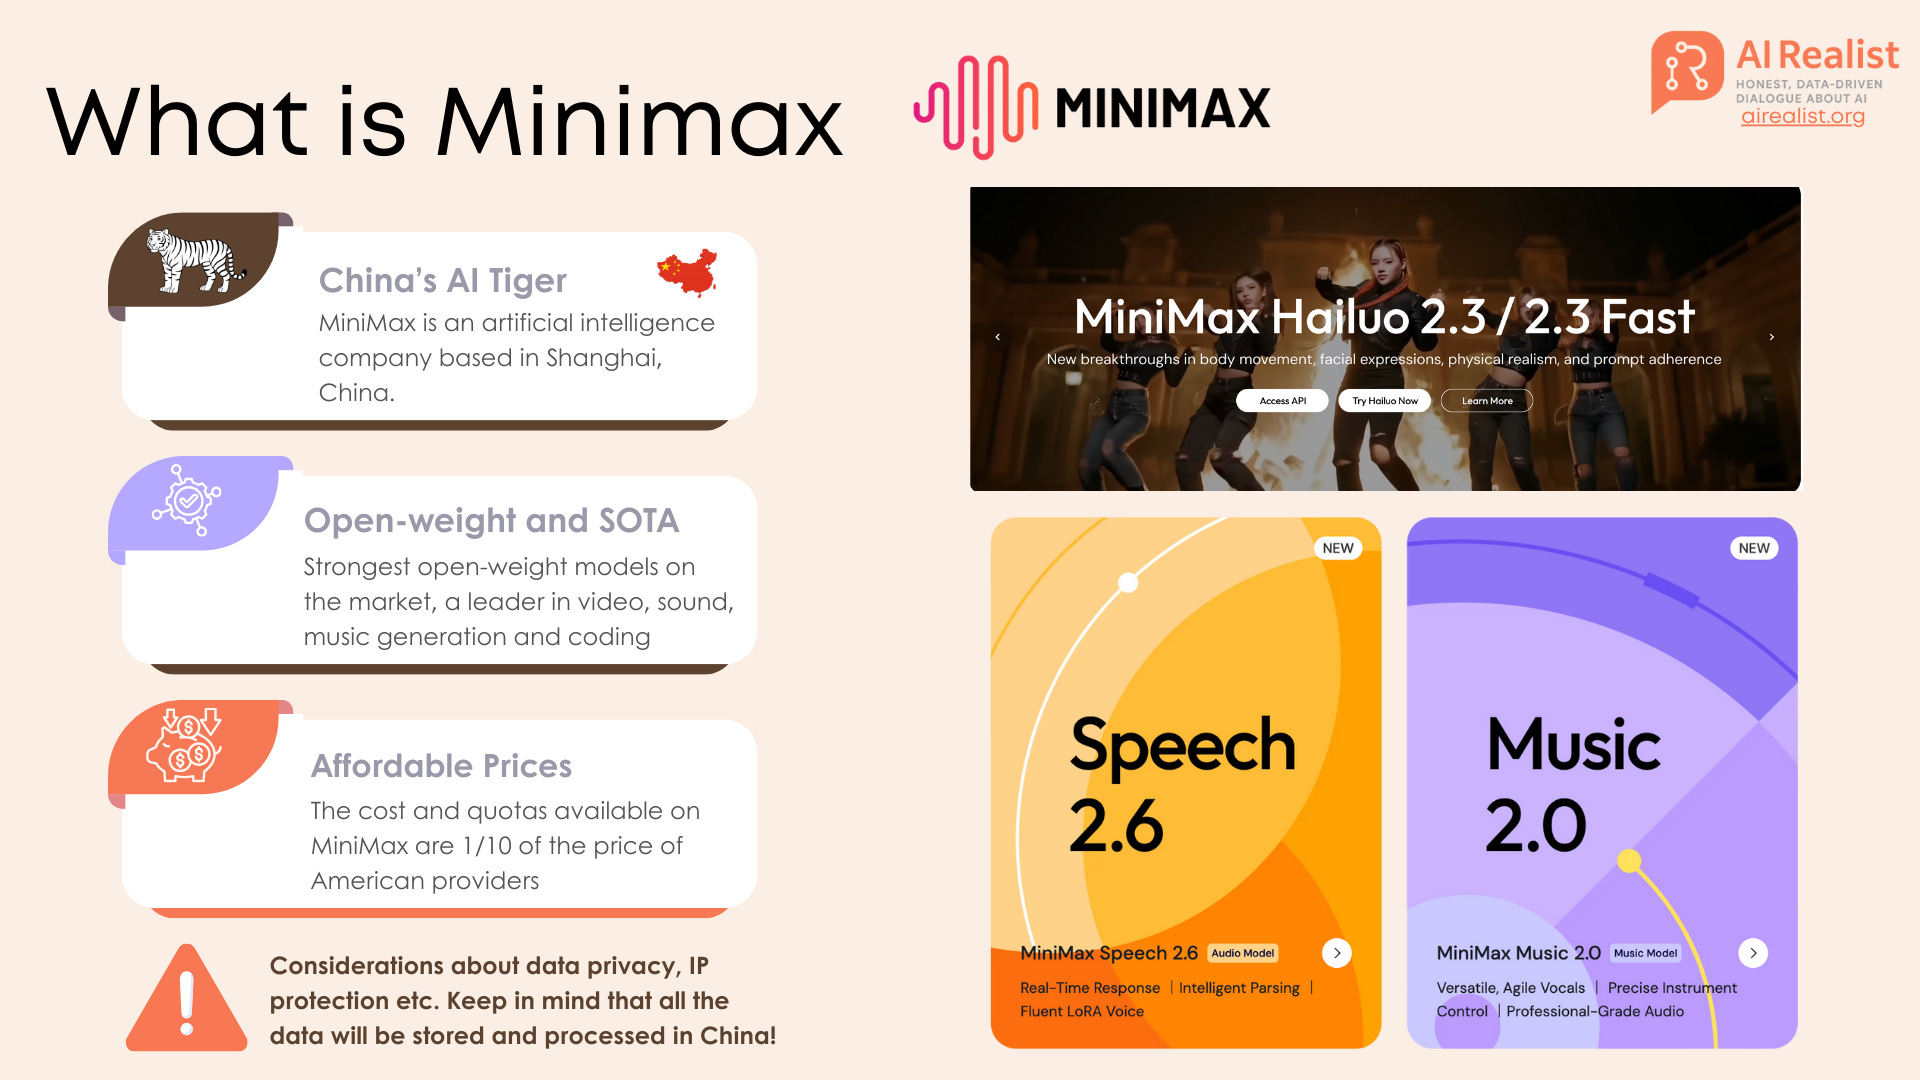
What is MiniMax? MiniMax is an artificial intelligence company based in Shanghai, often referred to as “China’s AI Tiger”. They are not just another wrapper; they develop state-of-the-art models for video (Hailuo), speech, and music.
Why are we using it? At AI Realist, we look for ROI, not just hype. MiniMax wins on three fronts:
The Cost: Their pricing and quotas are roughly 1/10th the cost of major American providers. When you are iterating on a training video and burning through credits to get the right shot, this difference is massive. The original plan for this tutorial was to utilize MiniMax and Gemini, but I discovered that my plan allowed only three video generations with Veo-3.1-Fast. MiniMax, by contrast, offers a much more attractive price for generating high volumes of video with their own model. Despite the security concerns of using a Chinese provider, I currently do not see a competitive alternative in the West. I hope one appears soon.
Physical Realism: The Hailuo models (specifically 2.0 and 2.1) have achieved significant breakthroughs in body movement, facial expressions, and prompt adherence. They are particularly strong at “character in a template” consistency, which is exactly what we need for our character.
The Ecosystem: It allows us to generate the video, the voiceover (via Speech 2.6), and the background score (via Music 2.0) all in one ecosystem.
While all the multimedia content was generated in MiniMax, I used Gemini to generate the prompts and scripts. Even though MiniMax has its own agent and LLM, I find that Gemini follows instructions better. Furthermore, although we use the MiniMax Hailuo platform, we rely on their deployment of Nano Banana for image generation and Veo 3.1 for difficult scenes —making Gemini the natural choice for prompting.
The Trade-off: We must be realistic about data privacy. MiniMax is a Chinese company, meaning your data is stored and processed in China. For a generic safety training video like this, it is acceptable. For highly sensitive internal IP, you would need to weigh this risk carefully.
Also remember, we are learning principles that can be used in any comparable platform! We are not learning where to click in Minimax. So this pipeline can be reused on other providers!
Upgrade your subscription to support this newsletter!
Also, check out our website for services, training, advisory etc:
Paid subscribers get:
Priority answers to your messages within 48-hours
Access to deep dives on the latest state-of-the-art in AI
Founding members:
A 45-minute one-on-one call with me
High-priority personal chat where I quickly reply to your questions within 24-hour
Support independent research and AI opinions that don’t follow the hype.
— or check out the shop
Step 1: The Script (Let the LLM be the Director)
Don’t write the script yourself. Use an LLM (like Gemini or ChatGPT) to break your scenario into AI-ready shots.
We used a scenario called “The Silent Breach,” where an employee named Mark props open a door, leading to a theft.
The Prompt Strategy: You need to force the LLM to act as a “Video Director” and strictly format the output. Crucially, you must define “Visual Anchors”.
The Rule: Define a “Uniform” (e.g., “High-vis yellow vest, dark jeans”) and repeat it in EVERY prompt.
Why? Because AI forgets. If you don’t remind it that Mark wears a high-vis vest in Scene 3, he might show up in a tuxedo.
Here is an example of a prompt but you are free to create your own:
Act as an expert AI Video Director. Convert the scenario below into a strict Img2Vid Scene Guide.

Core Constraints:

Visual Anchors: Define a single outfit (e.g., high-vis vest) and repeat it in every prompt. Use wide shots, silhouettes, or back angles to mask facial instability.

AI Physics: No complex fine-motor interactions (gripping keys, typing). Use only simple, gross-motor movements (walking, turning).

The Handshake: Ensure perfect continuity. The End Frame of Scene X must visually match the Start Frame of Scene X+1.

Format: Silent B-roll. For Scene 2+, explicitly instruct: "Use Scene [X] End Frame as input."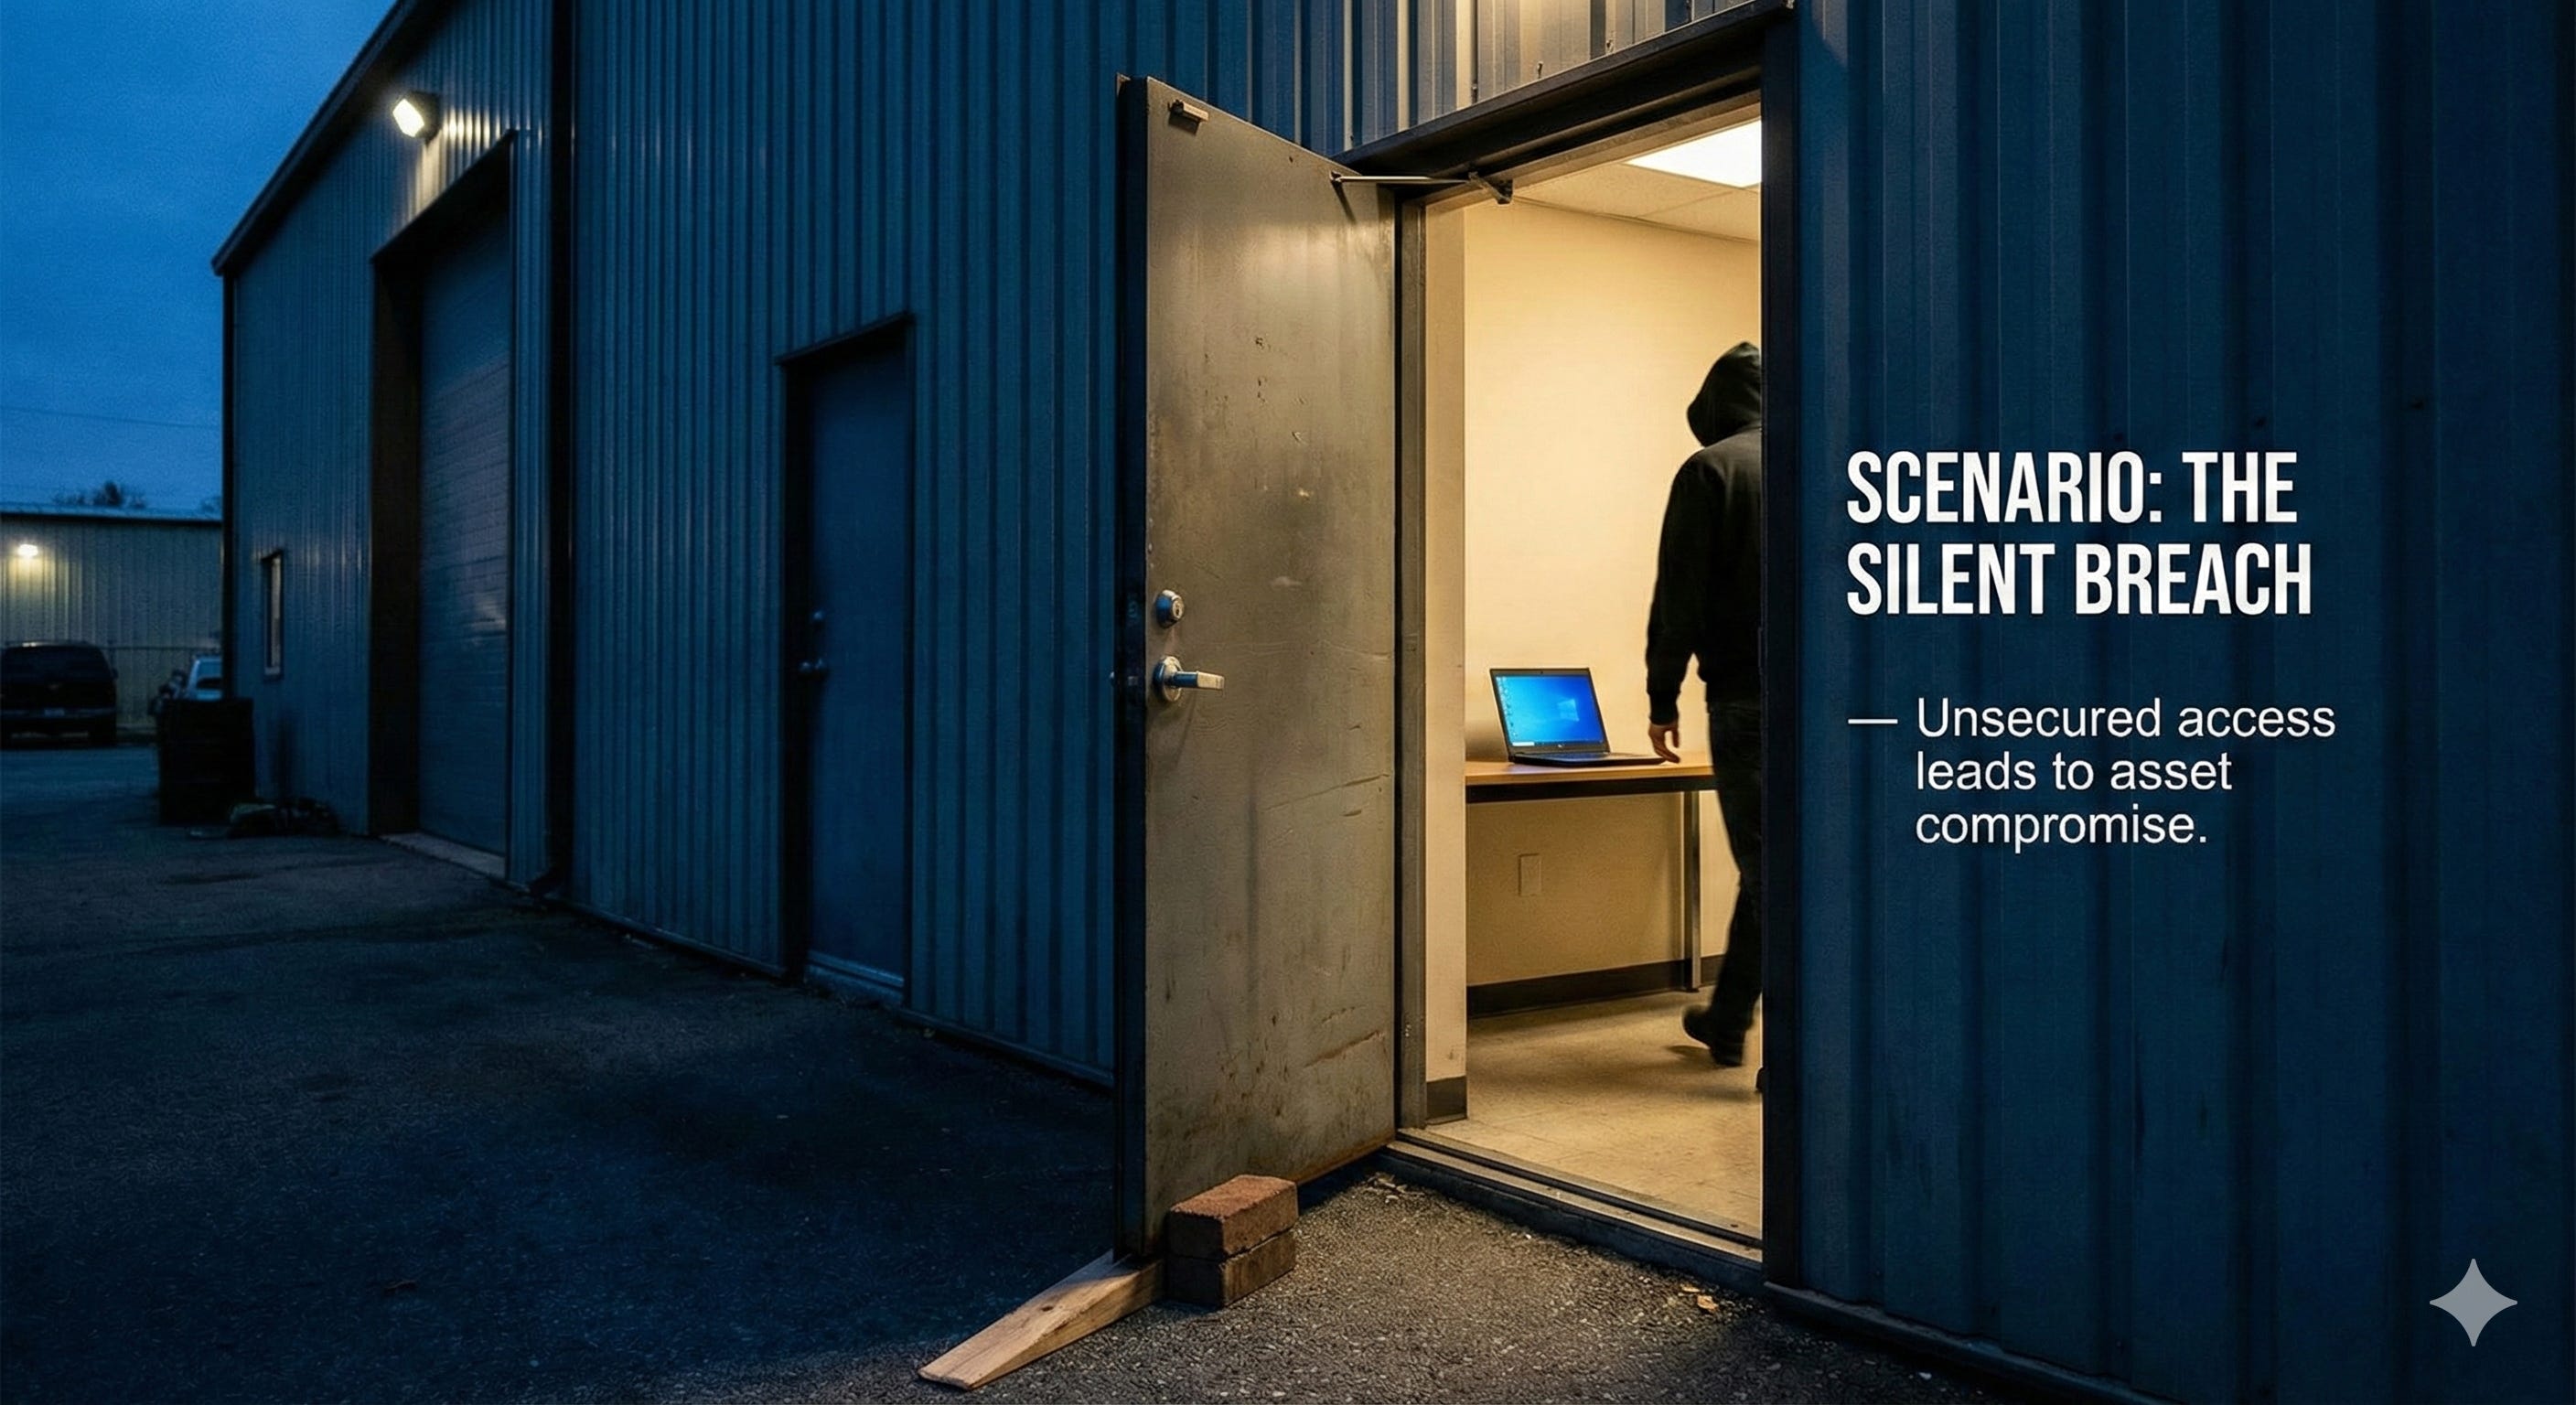
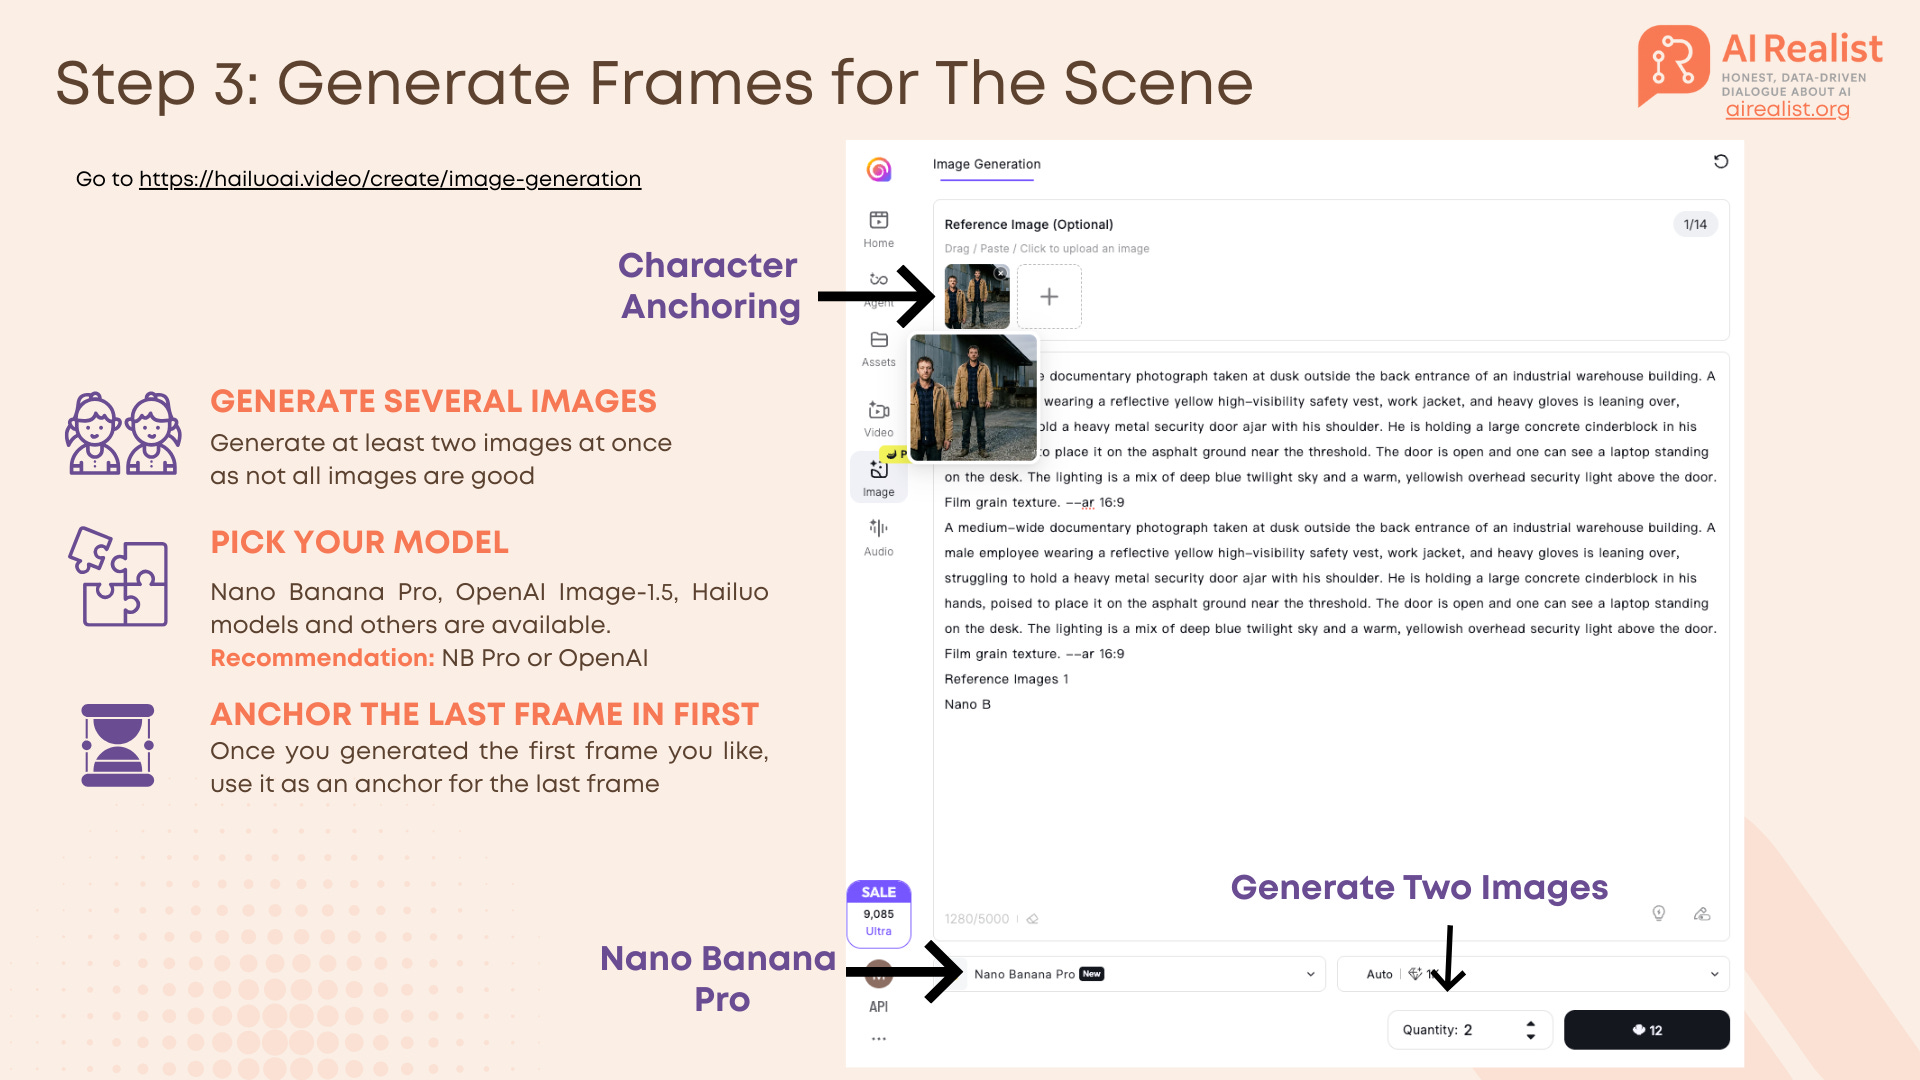
Step 2: Character Generation (The Anchor)
Before generating video, you must generate your “Actor.” Text-to-Video models often create inconsistent faces. We solve this by generating a high-quality reference image first.
The Prompt for “Mark”:
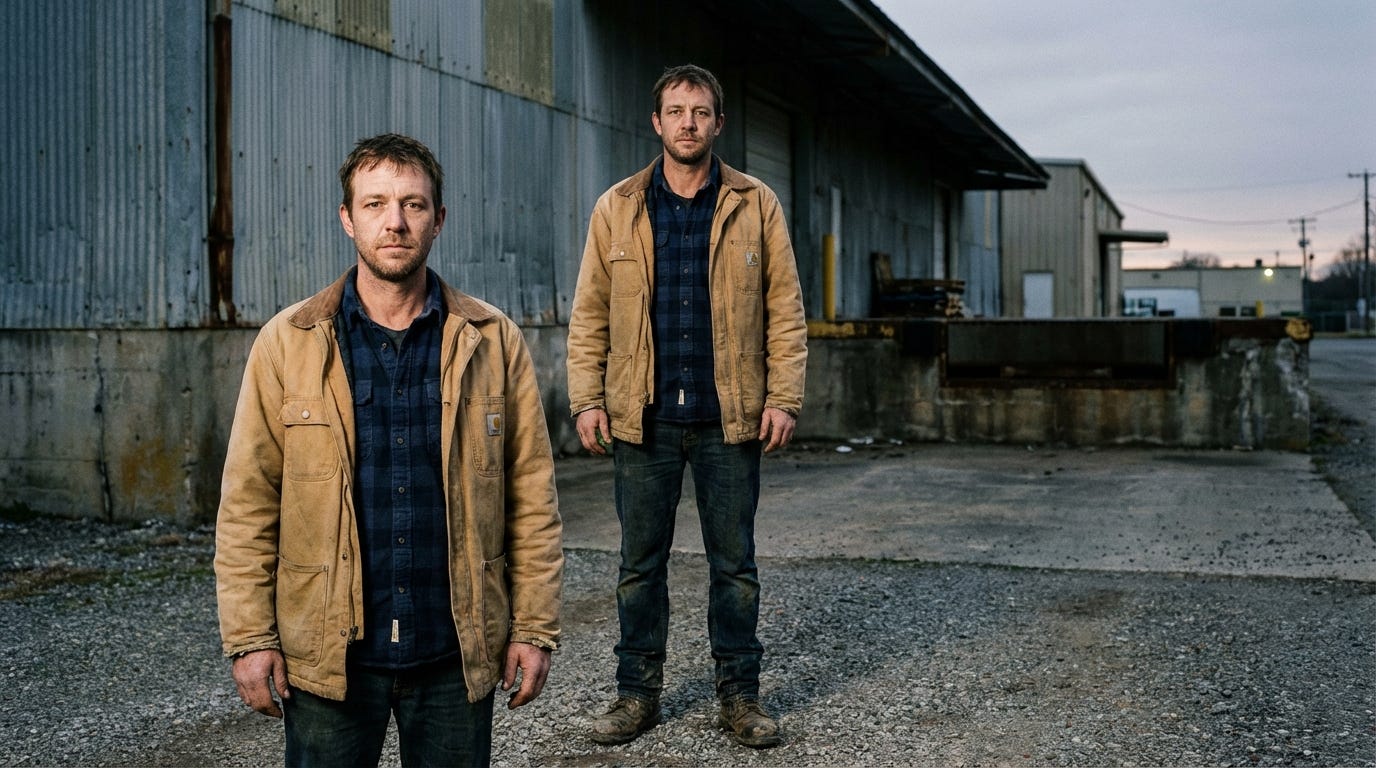
A documentary-style full-body photograph of Mark, a warehouse employee in his late 30s with a slightly tired expression, short brown hair, and stubble. He is wearing a worn tan canvas utility jacket over a navy blue flannel shirt, durable dark denim jeans, and scuffed leather work boots. He stands squarely facing the camera outside a large corrugated metal and concrete industrial building during twilight. The natural dusk lighting is diffuse, clearly illuminating his face and clothing details. The background includes gravel pavement and the corner of a loading dock. Film grain texture. 16:9I usually add the size of the image to be generated at the end of the prompts (16:9). HailuoAI has an option to specify it, but I tend to forget. I typically set it in the UI as well, but including it in the prompt acts as a safety backup. For all images, I usually generate two variants. However, if there is something complex to generate, I create more variants, as it is likely that many of the images will not turn out well.Use a model like Nano Banana Pro or OpenAI Image-1.5 for this initial image. Once you have a “Mark” you like, this image becomes the DNA for the rest of your video.
This is our Mark.
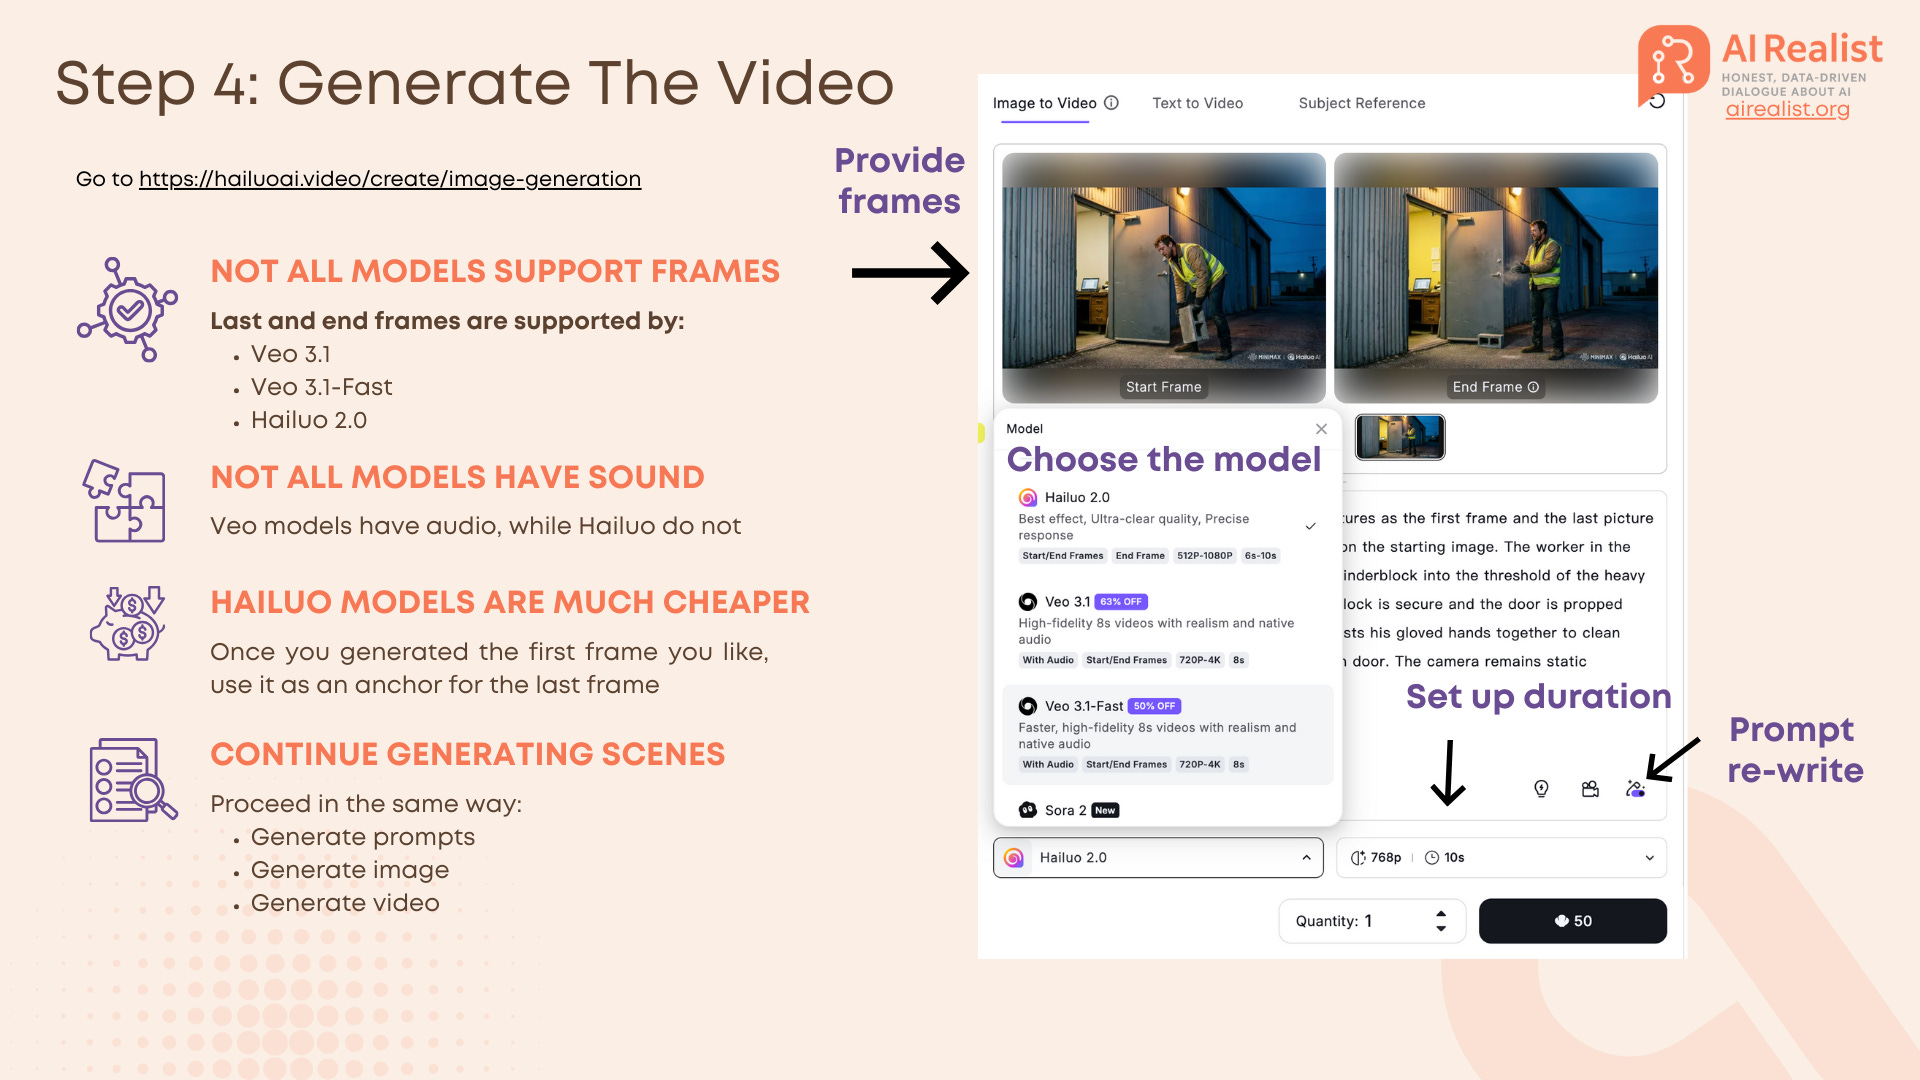
Step 3 & 4: The Handshake Execution (Start & End Frames)
This is the most critical step. We do not simply “text-to-video.” We use a Start/End Frame workflow to force the model to stay on track.
The Workflow:
Generate Frame 1 (Start): Use your character reference image (from Step 2) to generate the starting image of the scene. In our case, it is Mark
Generate Frame 2 (End): Generate the final image of the scene before you generate the video.
The Anchor Trick: When generating this End Frame, upload Frame 1 (and your original reference image - Mark) as an image reference. This anchors the generation, ensuring Mark wears the same clothes and stands in the same lighting in both the first and last second.
Generate the Clip: Pass BOTH the Start Frame and End Frame to the video model (e.g., Hailuo or Veo). The AI now only has to interpolate the movement between these two fixed points, rather than hallucinating the future.
The Handshake (Next Clip): For the next shot, take the End Frame of the previous clip and use it as the Start Frame for the new one.
Tools:
Hailuo 2.0: Does not have audio but is not needed, the scene is easy to generate, it is cheaper than Veo 3.1
Choosing Your Video Model
Not all video models are built equal, and crucially for our workflow, not all models support the Handshake Method (Start + End Frames).
In the MiniMax Hailuo interface, you currently have access to a few flagship models. Here is the breakdown of what to use and why:
The Contenders:
Hailuo 2.0 (MiniMax): This is our workhorse. It supports both Start and End frames, which is non-negotiable for consistency.
Pros: Extremely affordable, excellent “prompt adherence” for character movement, and it allows you to toggle “Prompt Rewrite” - a built-in feature that automatically optimizes your simple prompt into something the AI understands better.
Cons: No native audio generation.
Veo 3.1 & Veo 3.1-Fast (Google): Also supports Start/End frames.
Pros: Generates native audio (sound effects) synced to the video. It offers high fidelity with resolution options up to 4K.
Cons: Significantly more expensive and restrictive quotas compared to Hailuo.
Sora 2 (OpenAI): Available in the list, but currently does not support the End frame workflow effectively for this specific “handshake” technique. It only supports the first frame. Of course, you could do a work around and start generating the next video with the last automatically generated frame of the previous video, but this gives us less control and Veo 3.1 is comparable in quality.
Settings to Watch: When using Hailuo, you aren’t just stuck with a default. You can manually configure:
Duration: Set this to 6s or 10s. I recommend 6s for the “Handshake” clips to minimize hallucinations.
Resolution: Adjustable from 512p to 1080p depending on your credit budget.
Recommendation: Use Hailuo 2.0 for 90% of your shots to save budget and ensure character consistency. Only switch to Veo 3.1 if you have a complex scene (like the box drop) where physics and native sound are critical.
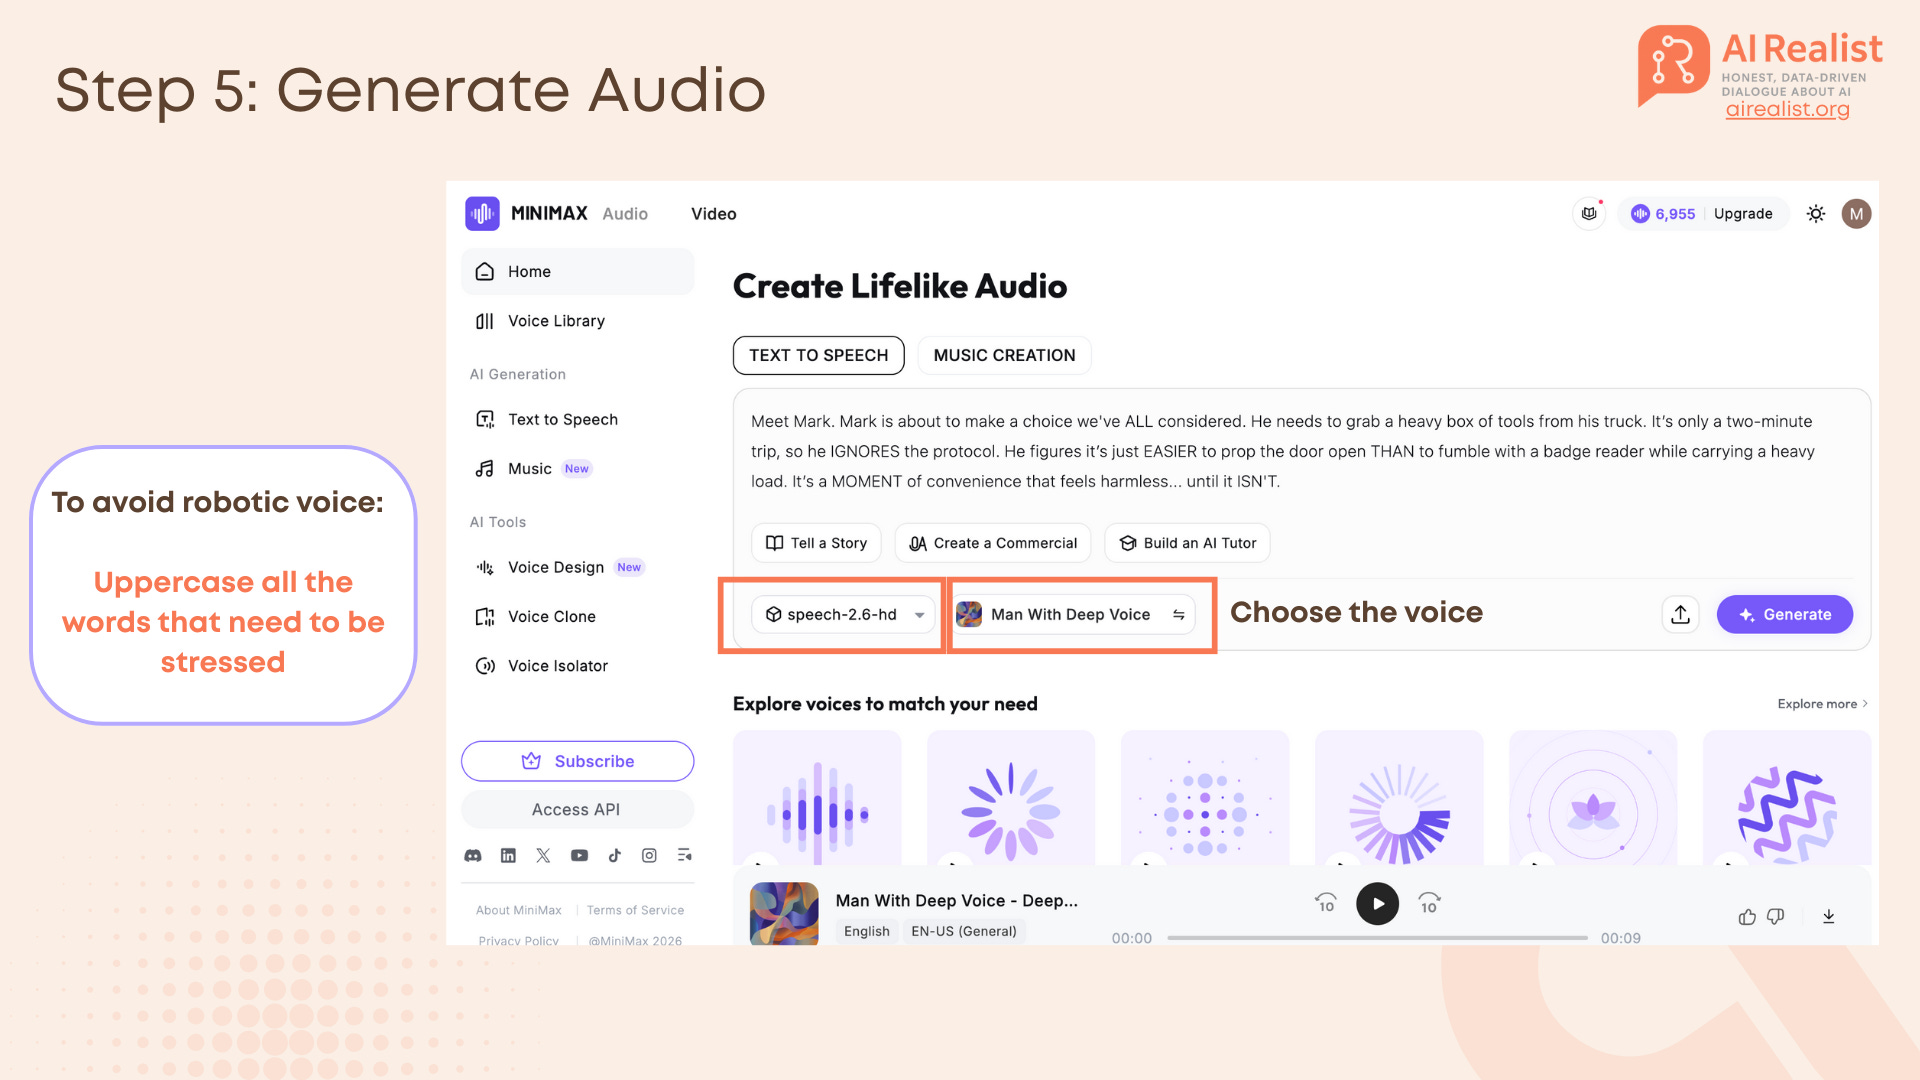
Step 5-6: Audio and Music
Video without sound feels fake. For “The Silent Breach,” we need a narrator and a tense background track.
Voiceover: We used MiniMax Speech 2.6.
Recommendation: To avoid a robotic voice, uppercase the words you want the AI to stress.
Example: “It’s only a two-minute trip, so he IGNORES the protocol.”.
If you are not sure where to put the stress, try to speak the text out loud and see where you would put the logical stress - you uppercase those words.
Compare this prompt:
Meet Mark. Mark is about to make a choice we've all considered. He needs to grab a heavy box of tools from his truck. It’s only a two-minute trip, so he ignores the protocol. He figures it’s just easier to prop the door open than to fumble with a badge reader while carrying a heavy load. It’s a moment of convenience that feels harmless... until it isn't.
And this prompt:
Meet Mark. Mark is about to make a choice we’ve ALL considered. He needs to grab a heavy box of tools from his truck. It’s only a two-minute trip, so he IGNORES the protocol. He figures it’s just EASIER to prop the door open THAN to fumble with a badge reader while carrying a heavy load. It’s a MOMENT of convenience that feels harmless... until it ISN’T.Music: We generated an instrumental track using MiniMax Music 2.0.
This is the prompt that was proposed by Gemini as a fitting music background. Surprisingly, the model really struggles to generate songs without lyrics, so I just had to cut out the parts with lyrics.
Cinematic industrial thriller underscore. A deep, low-frequency bass drone sets an ominous mood. Slow, ticking metallic percussion creates a sense of time pressure and stealth. Atmospheric, gritty, and suspenseful. No vocals. Minimalist style suitable for a security breach scene. The track builds slightly in intensity but remains dark and serious.I personally find the AI-generated music very impressive but also very concerning regarding how it might influence artists and how much copyrighted material went into those models.
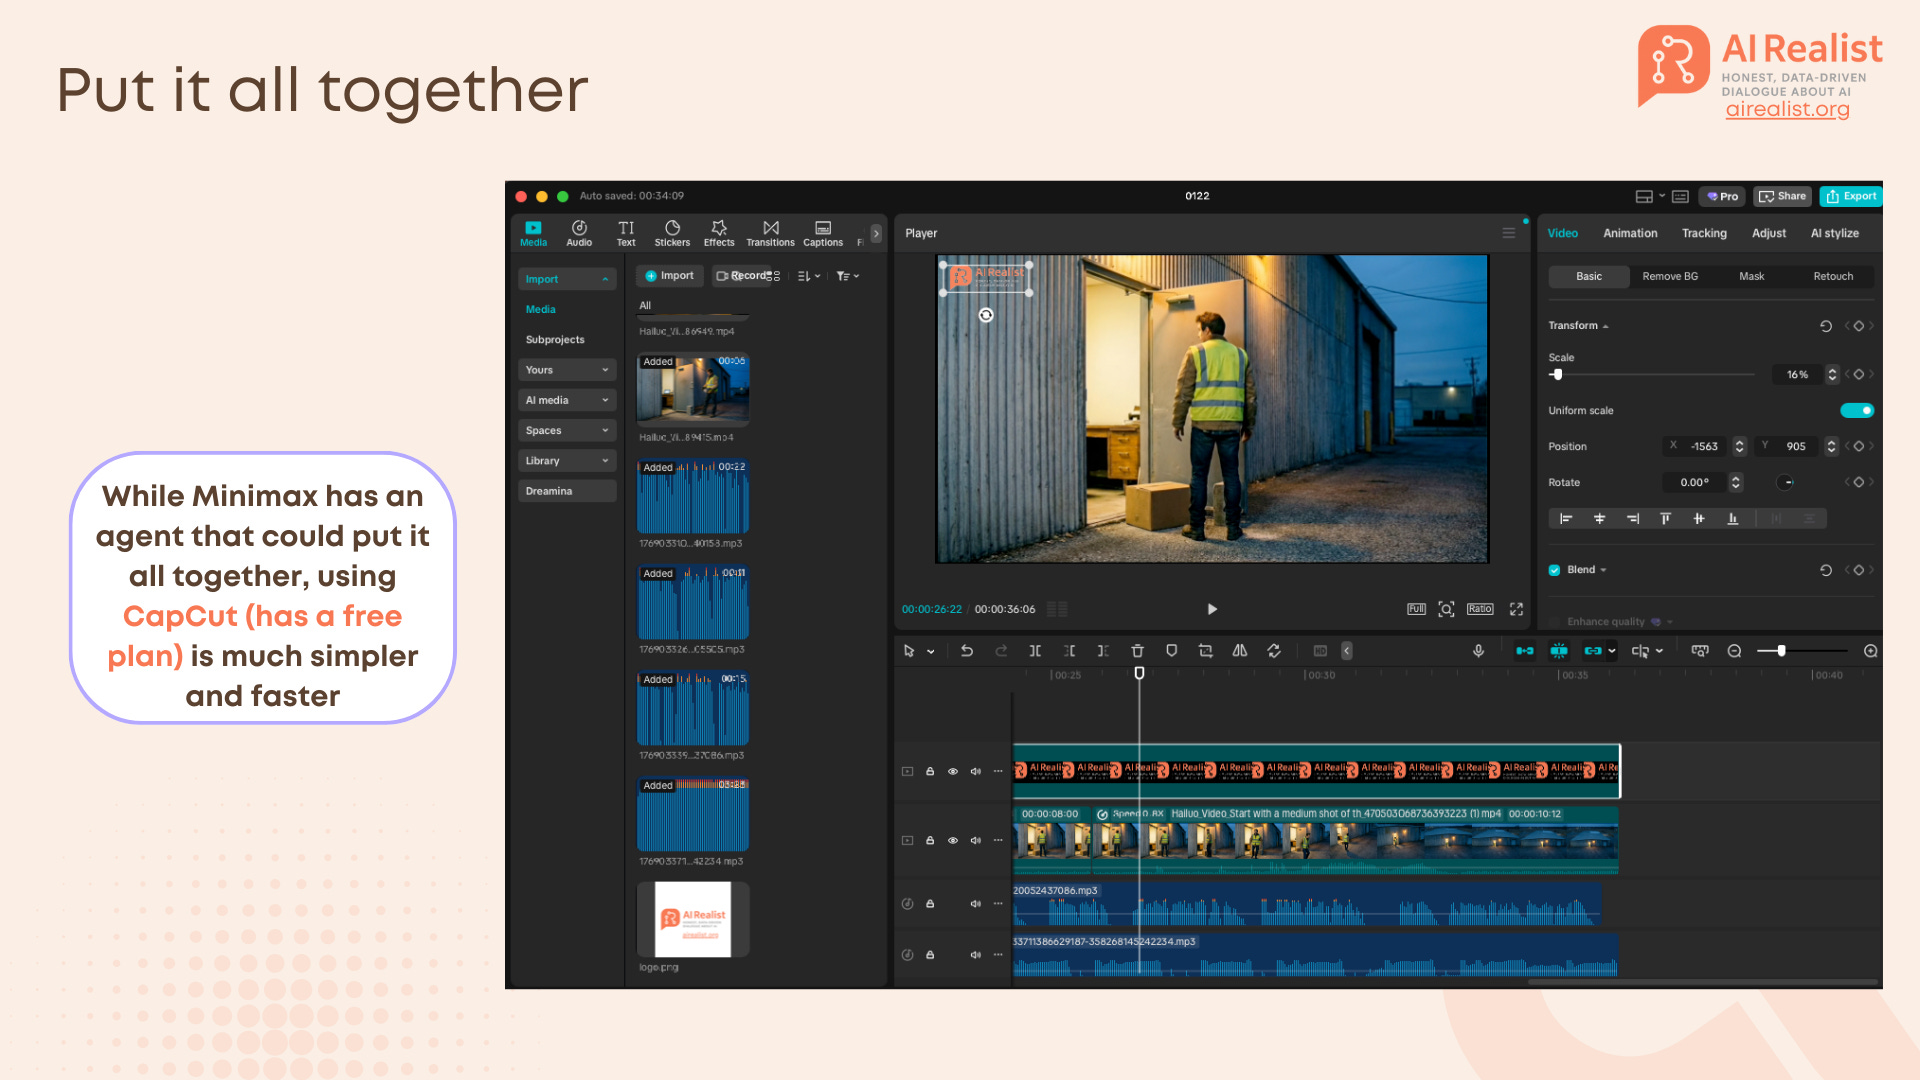
Step 5: The Assembly (Don’t Overthink It)
One can waste hours trying to find an “AI Video Editor Agent” that will magically stitch everything together. Don’t.
The fastest way to assemble these clips is a standard non-linear editor. We use CapCut Desktop because it is free, fast, and has built-in features that hide AI imperfections.
1. The “Invisible” Stitch
Import: Drag your “Handshake” clips (Clip A, Clip B, Clip C) onto the timeline.
The Cut: Place them strictly end-to-end. Because we used the Start/End Frame workflow, the pixels at the cut point should match perfectly.
Tip: If there is a slight “pop” or color shift between clips (which happens if the AI hallucinated the lighting slightly), apply a 0.1s to 0.2s Dissolve Transition. It smoothes over the glitch without looking like a cheesy fade.
2. Sound Design (Crucial) Some AI videos are silent by default, and some have the sound, depending if one used Hailuo or Veo. You must fill the void.
Track 1 (Voice): Drop in your MiniMax Speech file. Use CapCut’s “Auto Captions” to generate subtitles instantly if you feel like doing it.
Track 2 (Music): Add your MiniMax Music track. Lower the volume to -15dB or -20dB so it doesn’t fight the voice.
Track 3 (SFX): This is quite useful. Use CapCut’s internal library to add Foley sounds. If Mark drops a box, search for “Box Drop” or “Thud.” If he walks, add “Footsteps on Concrete.” These real sounds trick the viewer’s brain into accepting the AI visual as reality.
Why CapCut? CapCut is built for this speed. It has the stock library, the auto-captions, and the “good enough” filters built-in. It serves the purpose.
Limitations and ROI
That is not a perfect video. Mark does magic sometimes, like flipping the concrete brick. It might trick some people that it is not AI, but otherwise it is quite obvious. Though, maybe it is not the bad thing if people still can tell that it is AI-generated.
You still have to deal with copyright issues (models are trained on massive datasets of existing work), so if you use it, you need to keep in mind that at any moment it might generate something that oddly resembles a famous artist or singer.
Still, the cost savings are undeniable. A training video that used to require a film crew, lighting, and actors can now be prototyped in about 2 hours for a few dollars in compute credits. The video model will be getting better and better and trainings are a good use case for them.
Tools Used in this Tutorial:
Scripting: Gemini
Image/Video: Hailuo AI (MiniMax) & Google Veo.
Audio: MiniMax Speech 2.6.
Editing: CapCut.
Very helpful, thanks!
I think you found a very good use case for where AI video generation could be helpful.
The handshake method is brillant for keeping character consistency - I've been struggling with exactly this problem where the protagonist morphs into a completly different person halfway through. Your point about using the last frame as the anchor for the next clip is such a simple fix but somehow I never thought to enforce it that strictly. The ROI argument is really compelling too tbh, especially when you factor in iteration costs not just the first pass.